Help Center > Administration Module
Steps for Getting Started with Administration Module
INTRODUCTION
Administration Module has all the options to setup the company details and the overall initial setups of the instance
Sub – Modules
1) Branding
The whole information about the organization covered in the branding page. And it’s categorized into four parts with all the details needed.
To setup the company profile, go to:
Administration -> Branding -> Enter the Details -> Click on “Apply Changes”
Profile

- Company Name: Once added and submitted, can’t be changed from the front end.
- Director Name: The CEO or Director of the organisation should also be added to the site while importing employee data. The drop-down menu can be used to select the Director name, which is a required field. if the director’s name is not included in the list. It should be added from the Add/Edit Employee Details page in the Employee module.
- Description: Any description about the company or operations can be added from this Description option.
- Logo: The logo of the organization can be uploaded which should be less than 20KB in size. The uploaded logo here will be displayed in the Payslip of the employees.
- Phone: The Phone number of the organization can be added from here and it is editable.
- Email ID: The Email ID of the organization can be added from here and it is editable.
- Fax: The Fax number of the organization can be added from here and it is editable.
- Website: The Website of the organization can be added from here and it is editable.
- Header & Footer: The organization’s header and footer images can be uploaded and made available in the letters sent to selected new joinees or the current employees of the organisation. The header and footer images should not be larger than 20KB. The images can also be downloaded by clicking on the Download option present below the search tab.
Administration Setup
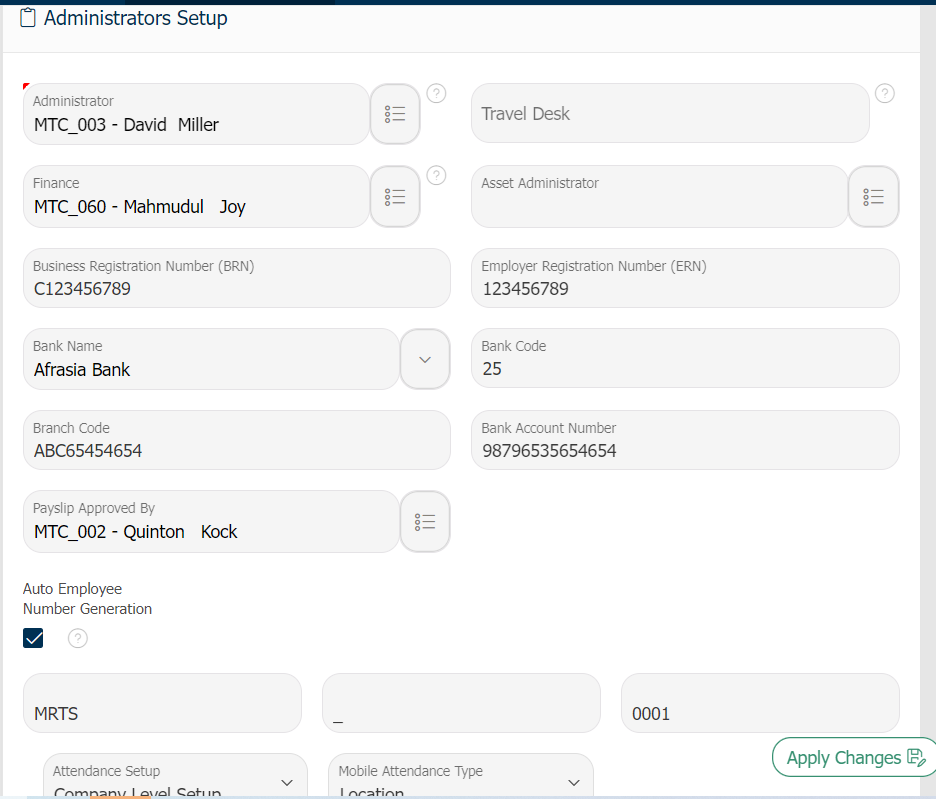
- Administrator: The organization’s application administrator can be selected from here which is a mandatory field to receive all notifications regarding requests for attendance regularization, leave approval or rejection, and leave applications
- Travel Desk: The email ID to whom the travel related info has to be posted should be mentioned.
- Finance: The notification of the finance related mails will be received by the employee selected from the list.
- Asset Administrator: The notification of the asset related mails will be received by the employee selected from the list.
- Business Registration Number (BRN): The Registration number of the organization provided while registration of the organization should be mentioned.
- Employer Registration Number (ERN): The Registration number provided for the Employer of the organization I.e., the Director or CEO.
- Bank Name, Bank Code, Branch Code, Bank Account Number: From the drop-down menu that displays on the administration module’s admin setup page, the bank name can be selected. When the bank name is selected, the bank code will automatically be generated. Should manually enter the Branch Code and Account number.
- Payslip Approved By: The employee selected from the list is the employee who approved the payslip, and the same name will appear in the Approved By section of the employees’ payslips.
- Auto Employee Generation: In PulseHRM, the Employee Code can be produced automatically. The Employee Code can be customized based on the organizational policies.
- Attendance Setup: Attendance Setup is of Two types:
A) Company Level Setup --> When you choose the company-level Setup, all of the organization’s employees should punch their attendance exclusively using Location or QR, depending on how the organization determines. Only when this option is chosen will the Mobile Attendance Type be displayed.
B) Employee Level Setup --> When you choose Employee Level Setup, you have the option of setting up mobile attendance with a location or QR code for each and every employee in the company. The employee mobile attendance setup page under the attendance module can be used to provide the configuration. According to the setup, employees can use our mobile application to punch in and out using location or QR code. - Mobile Attendance Type: Mobile Attendance Type is of Two types:
A) Location --> To allow employees to clock in and out using our mobile application with geo-tagging or location tracking, check this box.
B) QR --> When you choose the QR option, the QR can to be generated using the attendance module’s QR generator option based on the location. To clock in and out, the employee must scan the QR code.
Other Setups
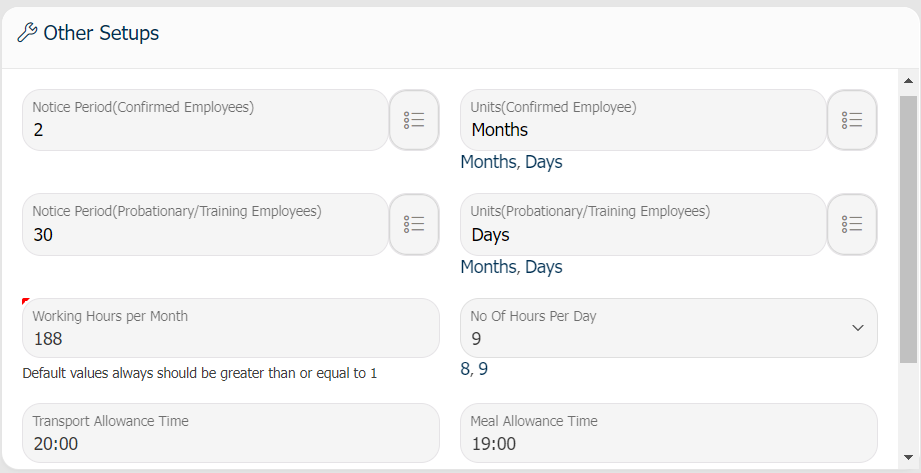
- Notice Period (Confirmed Employee): You can add the notice period of confirmed employees from this option which is a numerical value.
- Units (Confirmed Employees): The units, such as months or days, should be entered based on the numerical value added in the previous field.
- Notice Period (Training Employee): Can add the probationary or training employee’s notice period in this field which has to be a numerical value.
- Units (Training Employee): The units, such as months or days, should be entered based on the numerical value added in the previous field.
- Working Hours per Month: The total number of hours that an employee should put in during a month should be determined as the basis for calculating hourly pay.
- No of Working Hours per day: The total number of hours that an employee should put in per day should be determined as the basis for calculating hourly pay.
- Transport Allowance Time: If an employee works beyond the specified time here, they will receive half of their pay because the company offers transportation services; otherwise, they will receive their full pay as per the compensation guidelines.
- Meal Allowance Time: If an employee works beyond the specified time, they will be paid the Meal Allowance amount depending on the details of their remuneration.
- EOYB Calculation Method: A company employee who is qualified to EOYB at the end of the year can be paid EOYB as per the Mauritian Laws. Two different approaches are used to give employees their end-of-year bonuses:
- Normal Calculation: EOYB = Cumulative Earnings in the calendar year divided by 12.
- Cumulative Earnings: Cumulative Earnings of all payroll components applicable to EOY Bonus for 12 months.
- Last Basic: In this approach, the employee’s will be paid the last month’s Basic pay as EOYB.
- As the EOYB is often calculated in December, the employee’s November month’s Basic Pay is considered to be the EOYB amount.
Working Days
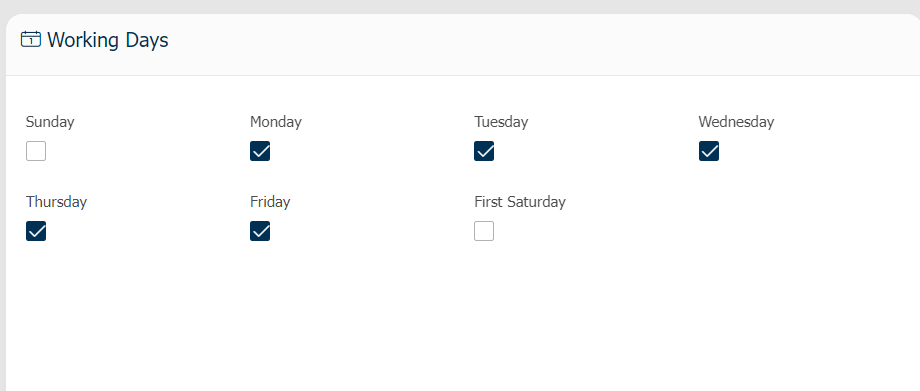
According to the policy, the working days of the organisation should be defined here. If an organization operates on all Saturdays, only the First Saturday should be chosen; otherwise, working Saturdays may be chosen.
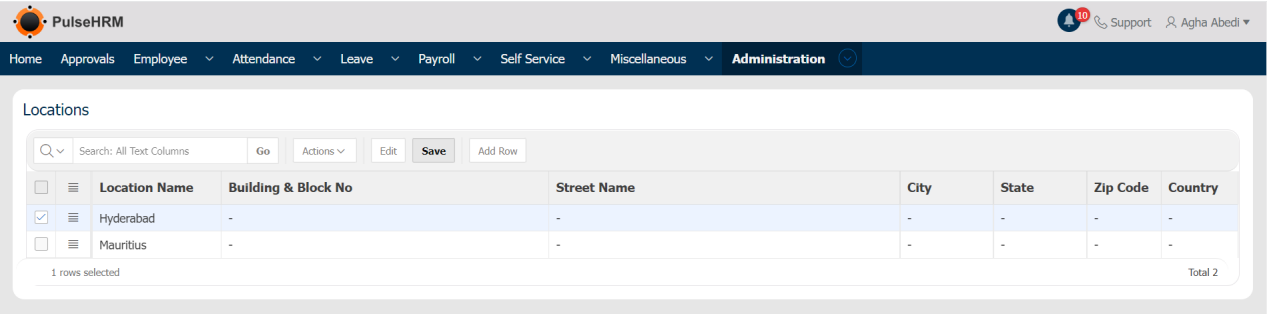
2) Location
The address of the organization’s headquarters, as well as the addresses of its branches can be added from the location page. While adding or editing employee details on the Add/Edit Employee Details page, the location names defined here will be displayed in the work location column.
Administration -> Location -> Click on “Add Row” -> Type in the location -> Click on “Save”
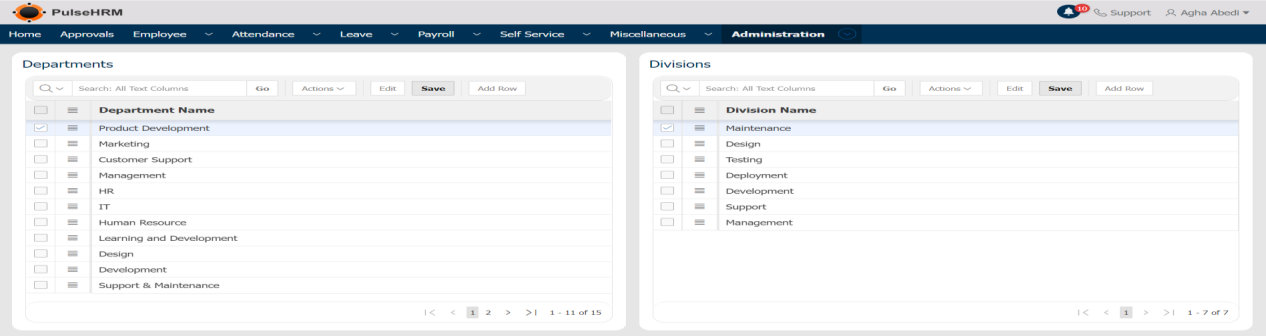
3) Admin Setup
A total of 5 tabs make up the admin setup:
- Department, Designation, Grade, Division: All of the organization’s departments, designations, grades, and divisions should be added.
- Bank: It is required to add the list of bank details, as well as the bank’s name and code, which will display on the branding page of the Administration module and the Employee module’s Employee details page for further procedures.
Go to Administration -> Admin Setup -> Click on “Add Row” -> Enter the data -> Click on “Save”
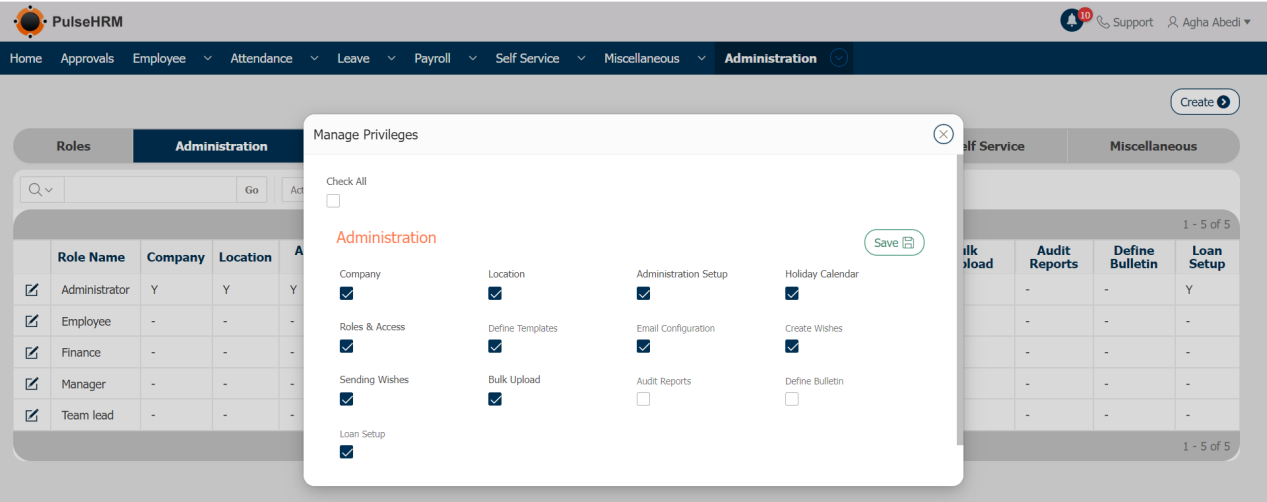
4) Roles & Access
The organization’s user roles can be defined from here; by default, an employee, an administrator, a manager, and a team lead will be available. Access to each and every module can be granted based on the organizational policies and the user role.
Go to Administration -> Roles & Access -> Create New Role -> Select Create -> Enter Details -> Choose Access to Pages or functionalities -> “Save”
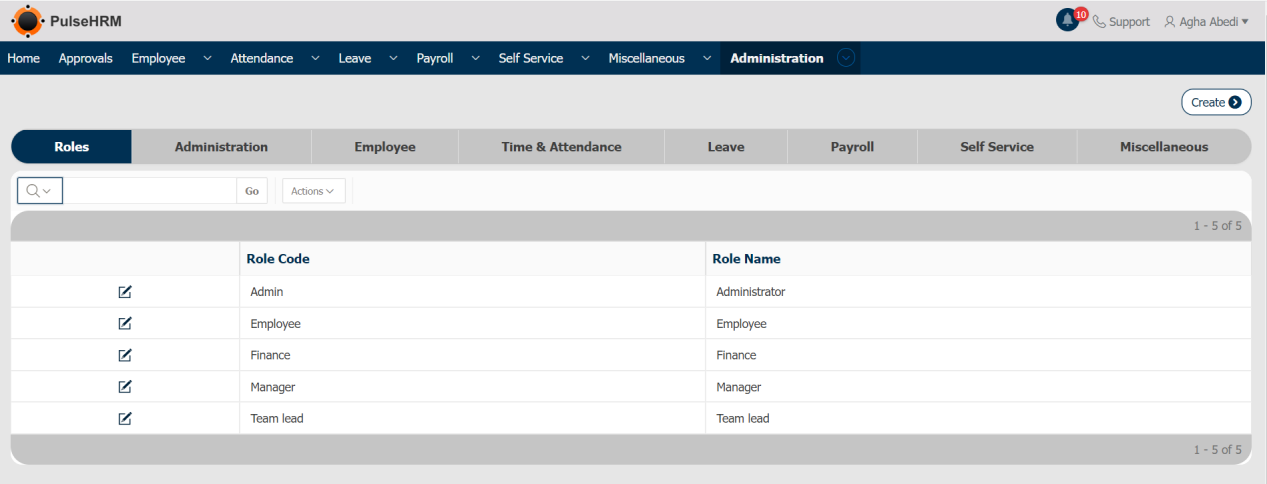
To provide access to the employees;
Select the module -> Click on “Edit” button -> Select the checkbox for the pages the access needs to be provided -> Click on “Save”.
5) Holiday Calendar
The list of public holidays can be imported or added, and it will be displayed on the portal’s home page under Upcoming Holidays section. The public holiday in the attendance module will automatically update based on the list of holidays.
Admin Setup -> Holiday Calendar -> Create Holiday -> Enter Details -> Save
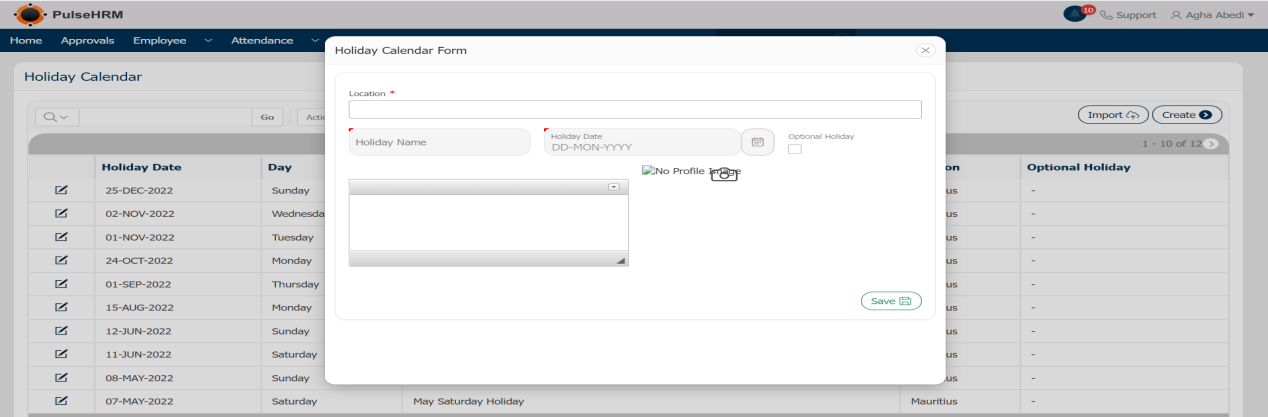
The template to import the data:

- The Holiday Date should be mentioned in DD-MMM-YY format.
- The Date, Name and location column cannot be left blank. Location can be separated by “:”.
- The Optional column can be either NULL or Yes.
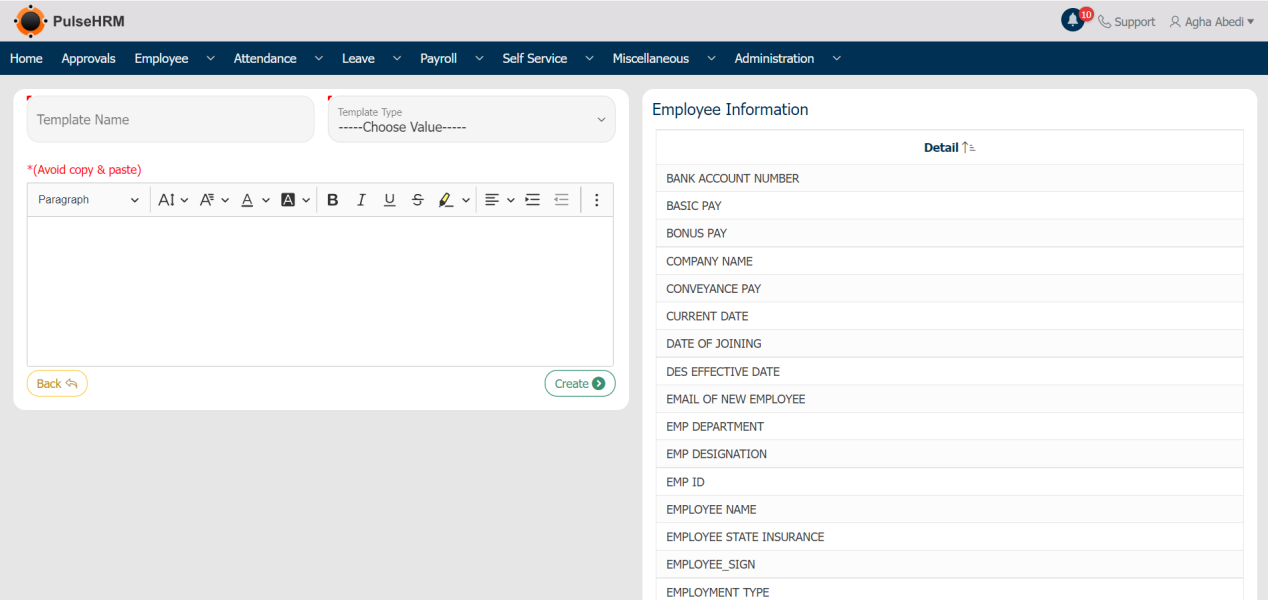
6) Define Templates
This is used to define the letters that are sent to the selected candidates and the employees who should serve notice during the onboarding and offboarding processes, respectively.
You can define the template by visiting:
Admin -> Define Templates -> Create -> Enter Details -> Select Tags -> Save
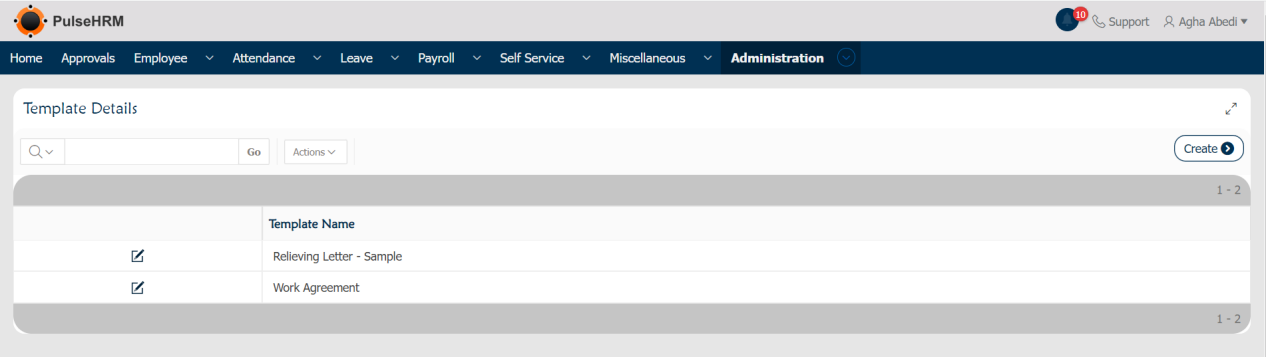
These tags should be selected while creating the template for auto-populating the details in the on-boarding page.
7) Email Configuration
It is the basic setting of the On-boarding process. The selected employees of the organization will be notified on the actions performed during the on-boarding and off-boarding process respectively.
To add the setup, go to:
Administration -> Email Configuration -> Enter the data -> Click on Apply Changes.
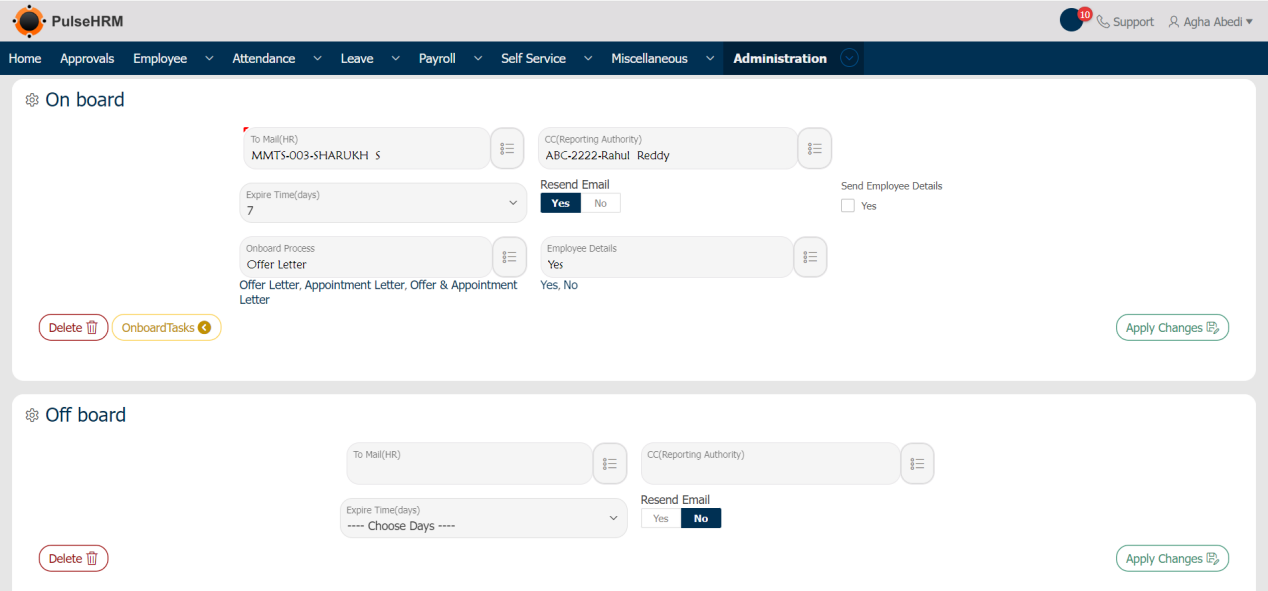
- To Mail (HR): The HR of the organization will receive a notification when the letters are sent to the candidates selected or the employees of the organization.
- CC (Reporting Manager): The Employee selected from the list of employee as Reporting Manager will receive the notification of the letters which have been sent.
- Expire Time (days): From the date of the letter being sent to the candidate, if the candidate does not accept or reject the same before the mentioned time. The letter will be expired.
- Resend Email: If the resend option is selected, the mail will be sent to the candidate after the expiry of the letter only once.
- Send Employee Details: If the check box is selected, there will be no letters sent to the employees only the employee basic details form will be sent which needs to be filed and submitted by the employee. If the check box is selected, the onboard Process and Employee Details field will not be visible else it will be visible.
- Onboard Process: It is used select the letter that needs to be sent during the onboard process.
- Employee Details: If Yes is selected, the basic employee details page will be sent to the candidates. If No is selected, the basic details page will not be sent.
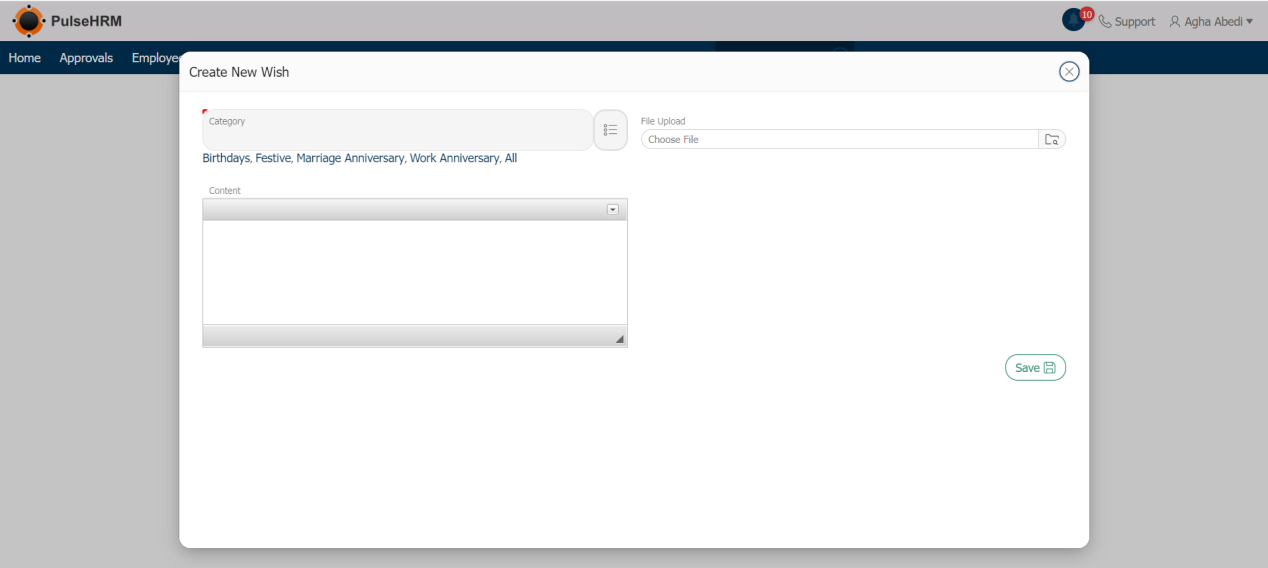
8) Create Wishes
The wishes can be created from the create wishes page. The admin has to add the wishes and save it. The wishes can be created, edited or deleted by the admin only.
Navigation: Administration -> Create Wishes -> Click on Create -> Select the Category -> Upload the image ->Renter the Content -> Click on Save.
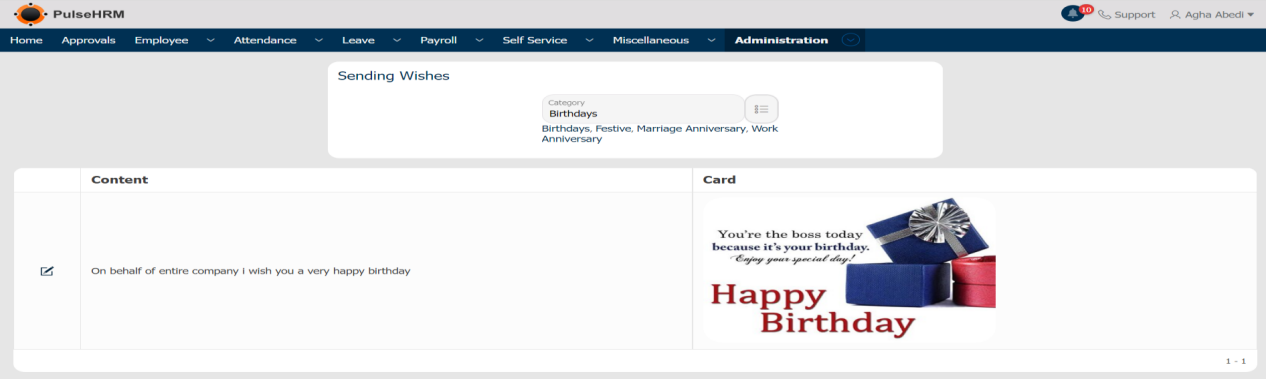
9) Send Wishes
The list of upcoming birthdays and work anniversaries are shown on the homepage. When clicked on the name from the birthday list, the page will navigate to the send wishes page from where the admin created wishes can be viewed and sent.
To send wishes, go to:
Administration -> Send Wishes -> Select the category -> Click on Edit button -> Enter the details -> Click on Send Wishes.
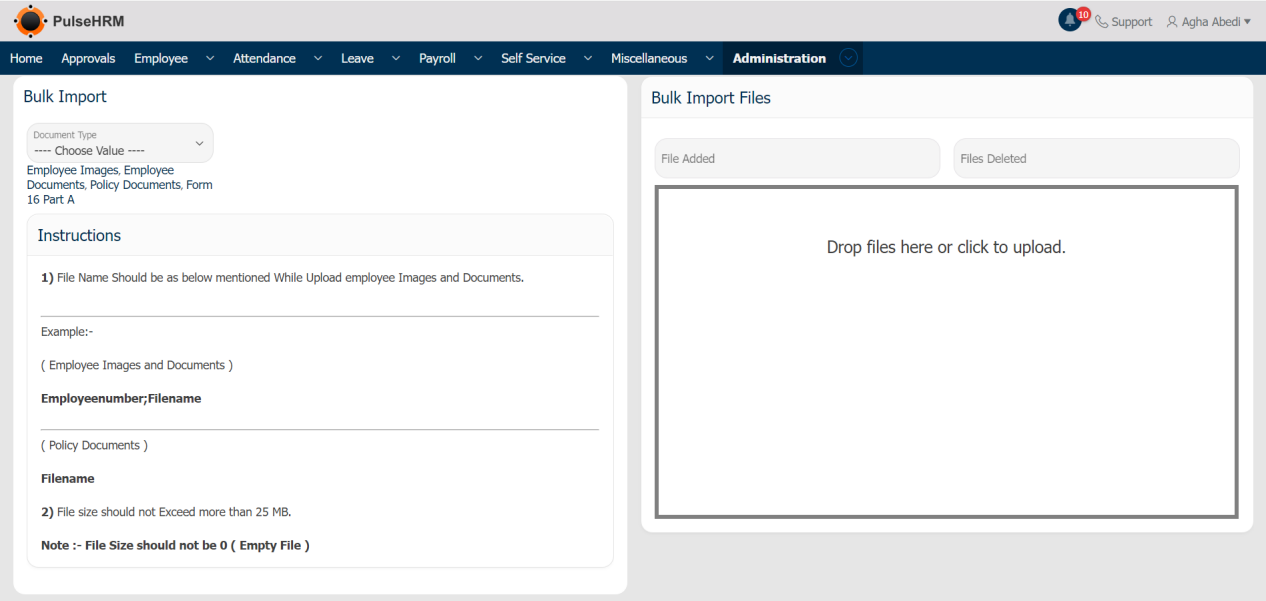
10) Bulk Import
It is used to import the employee basic details, account and contact details and the documents of the employee in bulk into the portal using a template.
To import the data in bulk, go to:
Administration -> Bulk Import -> select the file -> Download the template -> Enter the data and save it -> Upload the same into the portal by clicking on Upload.
The template for Basic details:

The template for Account and Contact details:
The template for Bulk import of document of a particular employee:
11) Loan Setup
The loan setup is used by the employee to submit the loan requisition from the organization. It can be submitted in two ways either in advance or for loan. The Advance is interest free, 1 or 2 months amount will be given in advance and the same will be deducted from the employee salary. When the Loan amount is more than 3 months basic amount, it will be provided sometimes with interest or sometimes without interest.
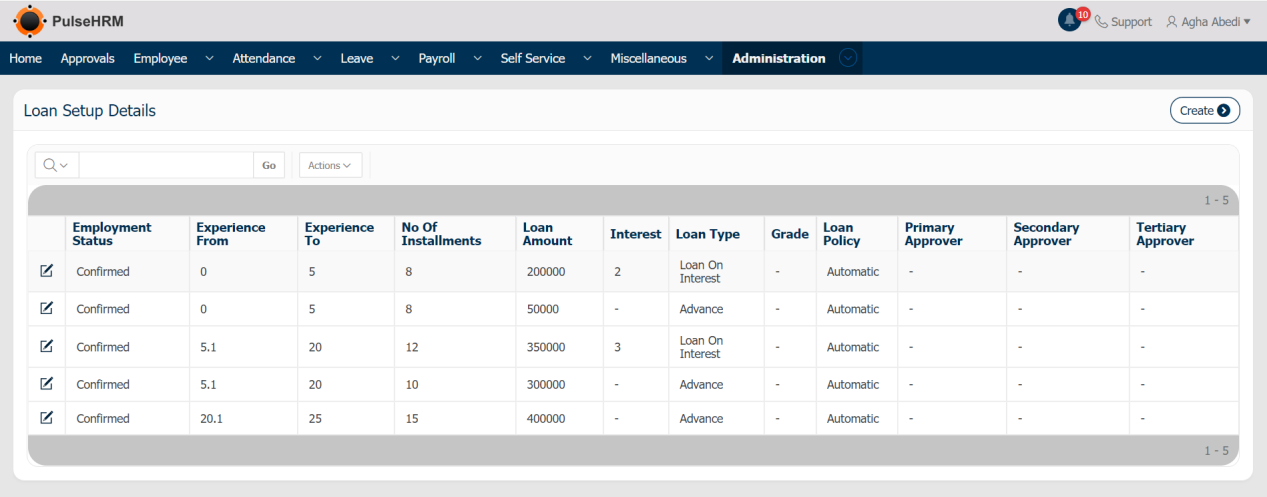
To provide the loan setup, go to:
Administration -> Loan Setup -> Click on “Create” -> Enter the details -> Click on “Save”.
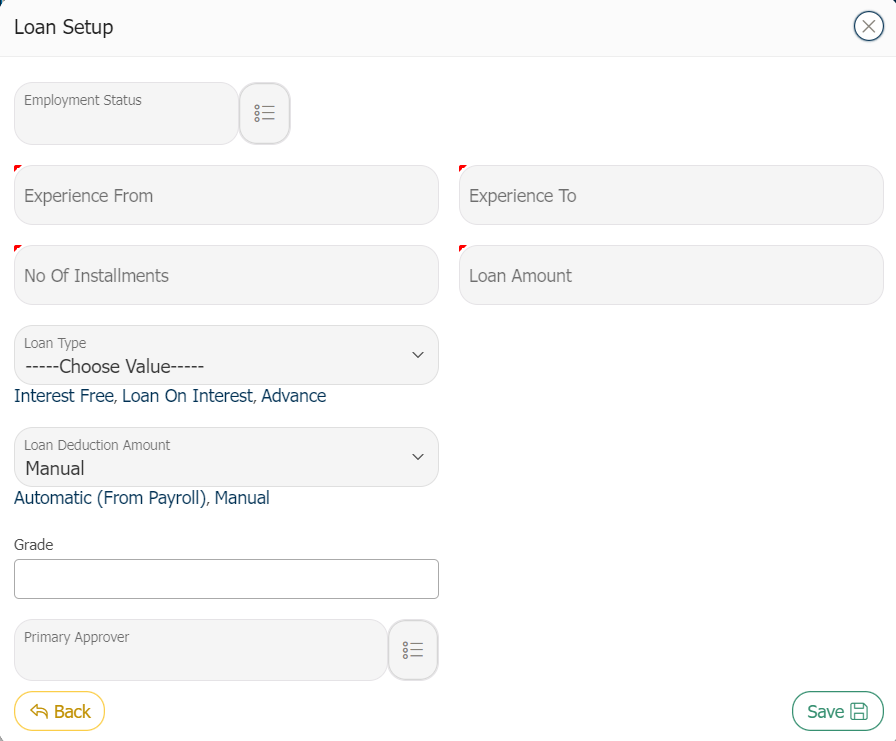
- Employment Status: The Status of the employee who is eligible for the loan should be selected from the drop-down either confirmed or Probationer.
- Experience from; Experience To: The Experience that the employee should have in the organization to be eligible for the loan category should be defined.
- No Of Installments: The no. Of installments in which the amount should be paid back by the employee should be defined.
- Loan Amount: The maximum limit on loan amount should be defined.
- Loan Type: The loan type is of 3 types:- Advance; Interest Free; Loan on Interest: When this option is selected, the rate of interest field will be visible where the ROI should be defined based on which the interest will be calculated and deducted.
- Loan Deduction Amount: It is of 2 methods:- Automatic (from Payroll); Manual
- Grade: Based on the employment status, the grade of the employee can also be selected.
- Primary Approver: Three levels of approver can be selected apart from the Reporting Manager, as RM is the direct approver for his/her reportee. When the Primary Approver is selected, the Secondary Approver field will be enabled, then the Final or Tertiary Approver will be enabled.